Plugins development workflow
Overview
All the released versions of the plugins can be available on the packages repository : http://repo-public.domogik.org The developer of a plugin just need to submit its plugin (more details in step 5).
We want to avoid alpha/beta/candidates versions for a plugin :
- it may be too heavy to handle for some developers.
- it will fill the packages repository with non stable plugin releases.
So, we want each developer to release a plugin version only when the plugin release in progress is finished (you will find a checklist of what is expected in the step 5). If some people wish to use a plugin under development, they just need to use the GitHub (or whatever else) repository (more details in the step 4).
Focus on the branches
For any Domogik package on git, you should follow the branching model described on this page. This branching model is inspired from the one here : http://nvie.com/posts/a-successful-git-branching-model/
Basically :
- the master branch contains the last stable release
- the develop branch contains the release which is currently developed. It you have to do any upgrade or fix, you should do them in this branch.
- when a stable release is ready (in the develop branch), you create a tag (and version) on the GitHub repository and then merge it into the master branch.
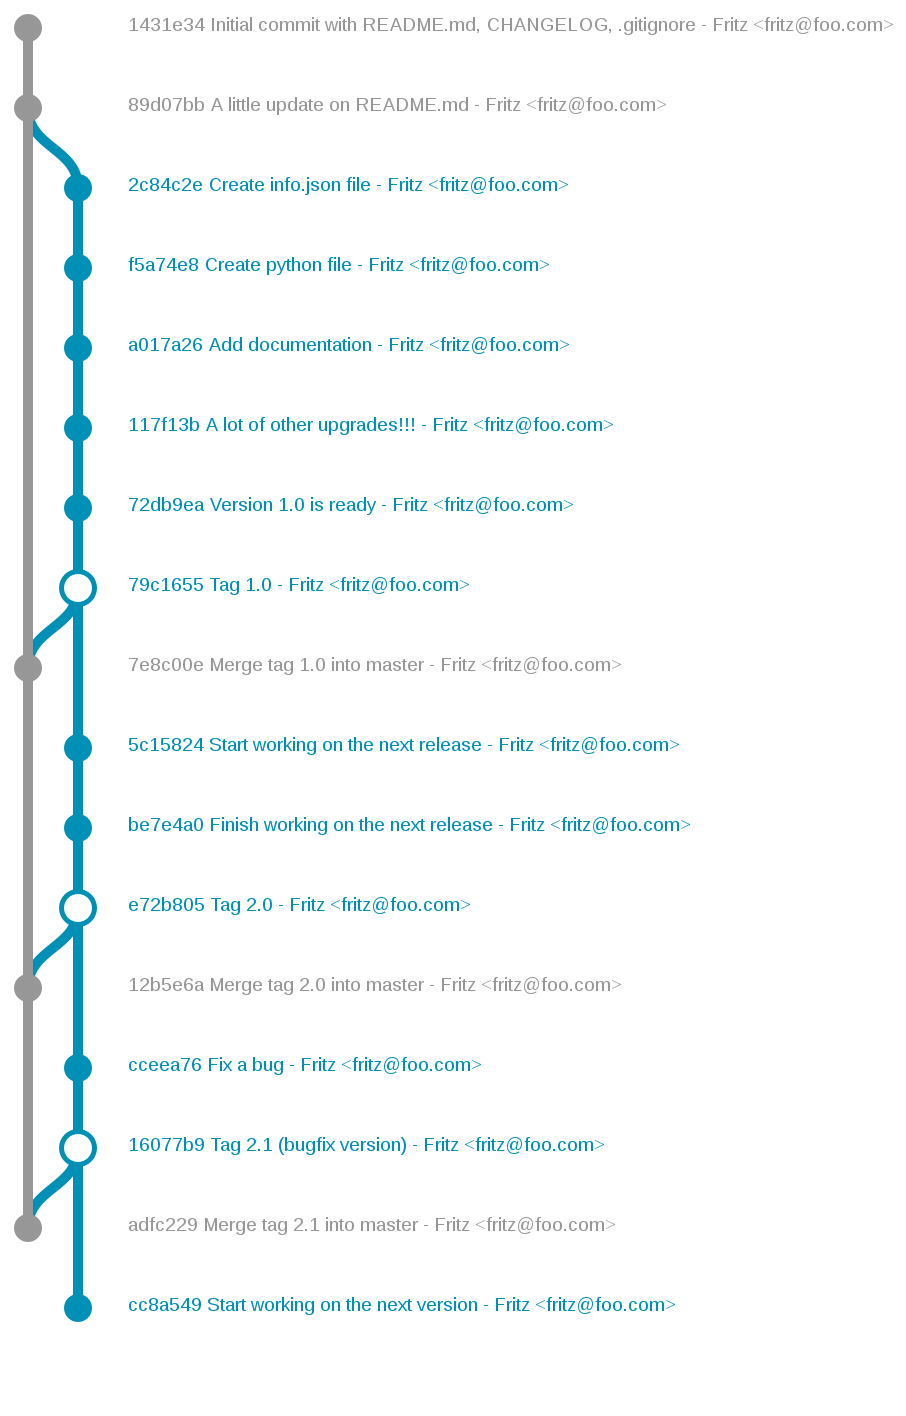
Example for a new plugin
On the left, there is the master branch. On the right, the develop branch.
Step 1 - prepare the information files on the master branch
You will find the links for these actions in the index of the plugin development documentation
This step goal is to provide at least a README.md file in the master branch to help people find the plugin documentation even if no release has been released (and so the master branch contains no plugin yet).
Step 2 - switch to the develop branch
Before coding anything you must switch to the develop branch : as the master branch content must be the last stable release of your plugin, you must NEVER do any development in this branch (master). This branch will be filled only with merge of the tags of the stable releases done in the develop branch.
First, if this is not already done, commit the changes on the master branch (README.md, CHANGELOG, .gitignore) and push them:
$ git status
...
        .gitignore
        CHANGELOG
        README.md
...

$ git add .gitignore CHANGELOG README.md
$ git commit -m "Initial commit"
[master (commit racine) e86b189] Initial commit
3 files changed, 9 insertions(+)
...
$ git push
...
To git@github.com:fritz-smh/domogik-plugin-teleinfo.git
 * [new branch]      master -> master
At this point, the master branch will only include nearly nothing. This is the goal! The master branch will be populated with the plugin data only when a stable version will be released.
Then, create the new develop branch and push it to the remote repository (on GitHub):
$ git branch develop
$ git checkout develop
$ git push --set-upstream origin develop
...
To git@github.com:fritz-smh/domogik-plugin-teleinfo.git
 * [new branch]      develop -> develop
...
You can now start to develop your plugin on this branch!
Step 3 - Develop the plugin
You will find the links for these actions in the index of the plugin development documentation
You should stay on this step until a stable version of your plugin is not ready in the develop branch. Please don’t forget that a stable version means:
- the plugin is functional and stable
- the plugin code is clean
- the info.json file is ok
- the documentation is written and handled by ReadTheDoc
- if the plugin technology allows it, some tests have been written and are functional with Travis CI
- …
You will find a complete checklist in a later step
Step 4 - Register a development version
Register the plugin the packages repository
A development version (which can be named as alpha/beta/candidate) will never be published on the packages repository as a release. But you can submit the direct link to the zip of the last commit of the branch develop on the package repository. This will allow:
- the plugin to be identified as an existing plugin still under development
- display the plugin build status in the packages repository dashboard
Go to the the packages repository and:
- login with your GitHub account
- Click on Submit a package
- Fill the form:
- Package url : the url to the zip of the develop branch. Example : https://github.com/fritz-smh/domogik-plugin-teleinfo/archive/develop.zip
- Candidate for the category : Development (at this point, do not use any other choice!!!!)
- Build status : the url to the picture of the Travis CI build status. Example : https://api.travis-ci.org/fritz-smh/domogik-plugin-teleinfo.svg?branch=develop
- Documentation : the url to the generated documentation. Example : http://domogik-plugin-teleinfo.readthedocs.org/en/develop/
- Click on Validate
- Click again on Validate
How to give some development releases to people who want to test ?
The best way to test a plugin during the development phase is to clone the repository. But you can also use the .zip file of the develop branch.
Step 5 - Releasing a stable version
The checklist
Here are all the prerequisites for a plugin to be stable:
Note
- The development of the features included in the plugin version is complete
- The plugin is stable (it has been tested a complete week without any restart)
- The documentation is finished and published on ReadTheDoc
- The tests are written, set with Travis CI and the tests results are OK
- A few people have tested and approved the plugin
- There is no license issue with the code
- All self.log.* calls use the u”foo” syntax to avoid charset issues
If one of these points is not OK, the plugin will not be validated on the package repository by the core team.
Prepare the release
First, you need to check you have no more upgrades in progress. You can check with the git status command.
Then, check that you have pushed all upgrades on the remote repository by doing a last push with the git push command. If some commits were not pushed, well… it means that only you have tested the last plugin upgrades and so the checklist is not fully ok ;). Get back later on the step 5 after some people have tested your last upgrades!
Check the info.json file is OK : the version set in the identity part of the json file must be set to the version number you want to release. Example for a version 1.0:
"identity": {
    ...
    "name": "teleinfo",
    "type": "plugin",
    "version": "1.0"
},
Check the docs/changelog.txt file is OK : the updates since the last release are described.
If this was not ok, fix this, do a commit, check that the plugin is still starting (if not, you made a mistake in the json file) and push the commit (and not, at this point you don’t need other people to test again).
Check all the existing tags for your plugin:
$ git pull --tags
$ git tag -l
Check that there is not already a tag created for the version you want to release. If so well… you are bad somewhere!
Now, set a tag for your release. For example:
$ git tag -a "1.0" -m "release 1.0"
Push the tag on the remote repository:
$ git push --tags
And finally, merge the tag in the master branch. For example for our 1.0 release:
$ git checkout master
$ git merge 1.0
Push the merge:
$ git push
And get back to the develop branch:
$ git checkout develop
You now have finished the actions on your local repository!
Check that the Travis CI build is ok for your tag
Go on the Travis CI page of your plugin and check in the Branch summary tab that a build has been done for your tag and is OK (you may need to wait a few minutes if you just pushed the tag). Example for the teleinfo plugin: https://travis-ci.org/fritz-smh/domogik-plugin-teleinfo/branches
Get the build status picture url for the release of your plugin and keep it somewhere for the submission. Example url for the teleinfo plugin and its release 1.0: https://api.travis-ci.org/fritz-smh/domogik-plugin-teleinfo.svg?branch=1.0
Configure ReadTheDoc to build the new version
Connect to your ReadTheDoc account and go in your project homepage, for example: https://readthedocs.org/projects/domogik-plugin-teleinfo/
Go in the Admin section, then in the Versions section and:
- Set 1.0 as the default version (assuming 1.0) is the last version of your package). If you can’t select it, first check the 1.0 version to activate it and click on Submit. You will now be able to select this version.
- Uncheck the stable version
- Uncheck the master version
- Uncheck the latest version
- Check the develop version
- Check all the released versions (1.0, …)
Now, check that the documentation has been generated and get its url. It should be something like http://domogik-plugin-teleinfo.readthedocs.org/en/1.0/
Create a release on GitHub
This part is mandatory : when a tag have been created, you can see the corresponding release in the Release section of a GitHub repository. Creating a release will only help you to give more informations. This is not needed but this can be nice looking on your Github repositories ;)
Finally : submit the package!
Now, the final step! You can submit your package as a stable release!
Go on http://repo-root.domogik.org/ and lg in with your GitHub account.
Click on Submit a package and fill the form:
- Package url : the url to the zip of the released branch. Example : https://github.com/fritz-smh/domogik-plugin-teleinfo/archive/1.0.zip
- Candidate for the category : Stable. If you think your package may need to be tested by some people before setting it as stable, you should select Testing : we will be able to move it from Testing to Stable later.
- Build status : the url to the picture of the Travis CI build status. Example : https://api.travis-ci.org/fritz-smh/domogik-plugin-teleinfo.svg?branch=1.0
- Documentation : the url to the generated documentation. Example : http://domogik-plugin-teleinfo.readthedocs.org/en/1.0/