/cmd - send commands to devices
Purpose
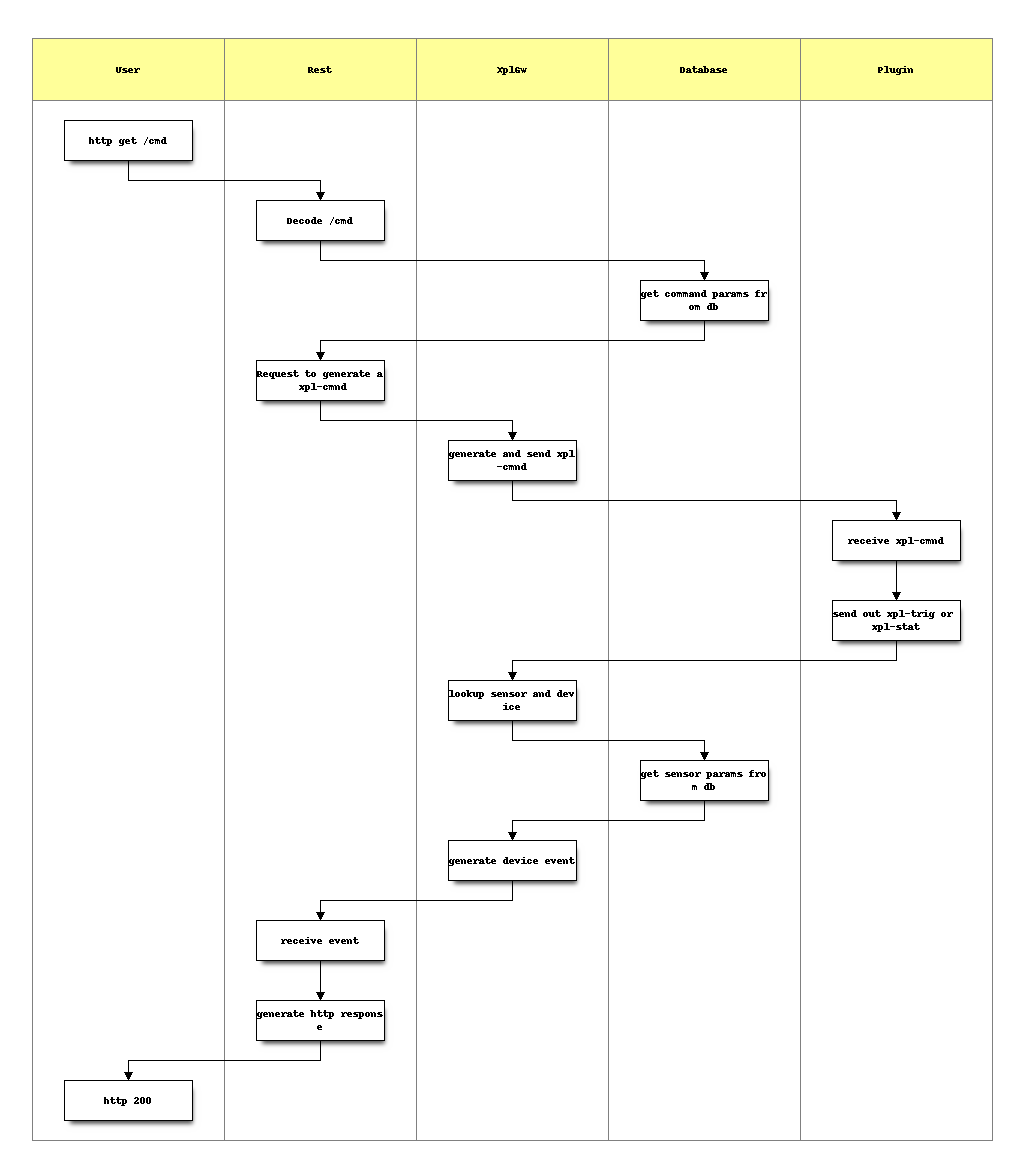
The /cmd entry in REST is used by User Interfaces to send commands to devices.
For a xPL plugin, the translation of the url in a xPL message is done based on the database content (the device feature options) and the info.json file of the plugin.
Url description
http://ip:port/cmd/<command id>?<key1>=<value1>&<key2>=<value2>&...
The goal is to be able to generate a xpl message based on a simple url.
The url is formatted like this :
- the first param is command id, this is a defined command in the DB
- the options are corresponding to the parameters of the command, for example the status to apply to a light (on, off) or the dim level to apply to the light. The values that can be used for a device feature are related to the device feature data type.
How the UI will get the status/value of the device feature ?
REST only sends http code as response. If http code = 200, then the user interface should request REST to get the last sensor value (a command is always linked to a sensor in the info.json file). To get (for example), the level of a dimmable device after a “+10” increasing command, UI will use /sensor url to get the last value.
How do I find the command id ?
To find the command id of a device command, you first need to query the /device url and parse the commands part.
I am a user interface developer and I don’t understand the values to use for the parameters in the url options!
To help you to understand with real examples, or to check you are building your /cmd urls in the correct way, you can go in Domogik admin and check the details of a device. You will see all the /cmd available urls for the commands and all /sensor available urls for the sensors.
Which values should be used ?
You device is related to a data type. Depending on the data type, you will be able to use some values.
Example 1 : DT_Switch
The data type DT_Switch allows these values:
DT_Switch
        labels:
                1 = On
                0 = Off
The related part in the json file which describes the data types is:
"DT_Switch": {
    "labels": {
        "0": "Off",
        "1": "On"
    },
    "parent": "DT_Bool",
    "childs": []
},
So, the available values that can be used in the url are 0 and 1. The labels on and off are used only for display in the user interface : the button to send the value 0 will be named as off.
Note
Notice that is 0 and 1 are the values of the /cmd url, these values can be translated to something else (off/on, low/high, ...) in the generated xPL message. More informations in the conversion chapter.
The goal of the /cmd url is really to be the same for all devices features of the same data type! If the xPL messages are not the same for 2 plugins which use the same data type, this is handled by the plugins thanks to the conversions.
Example 2 : DT_State (which is a boolean data type as DT_Switch)
Here is the related json part for the data type:
"DT_State": {
    "labels": {
        "0": "Inactive",
        "1": "Active"
    },
    "parent": "DT_Bool",
    "childs": []
},
As you can see, the only difference with the DT_Switch are the labels values.
Examples
Todo
Add more examples
The following data is in the DB:
Device
id = 1
name = test
usage = ventilation
type = x10.relay
Commands
id = 10
name = command1
xpl_command_id = 12
Command params
id = 11
key = level
Xpl command
id = 12
device = 1
schema = lighting.device
Xpl command param
command = 12
key = address
value = 12
Now if we call the ‘/cmd/10/level/100 we will generate the following xpl command:
lighting.device {
    level = 100
    address = 12
}
This example demonstrates how the url can generate any type of xpl message, the number of command params or xpl command params is unlimited.
The commands are dynamic parameters and need to be sent via the url, the xpl command params are staticly defined, these definitions are done during device creation and are not changeable afterwards.